Login Form
 |
 |
 |
|
FIGHTER SQUADRONS OF THE ALLIANCE: AN ANALYSIS OF THE BATTLE OF YAVIN (May 1999) by
This e-mail address is being protected from spambots. You need JavaScript enabled to view it
THE SQUADRONS At the Battle of Yavin, there were four fighter squadrons: The novelization of the movie indicates : "Yellow squadron will cover for Red on the first run. Green will cover Blue on the second," Red was a Y-Wing squadron, and Blue was an X-Wing squadron. So we start off assuming Green is the second Y-Wing squadron, and Yellow is the second X-Wing one (based on the number of starfighters from a picture provided below, and a list of pilots also provided, there were more Y-Wings and X-Wings than the number of pilots in Red and Gold squadrons.) In the movie, X-Wing "Blue" became Red squadron, and Y-Wing "Red" became Gold squadron (the color also changed from yellow to gold). And we do see Gold making the first run, and according to the novel, "Yellow" squadron was covering for them somewhere off-camera (1). So "Yellow" squadron became Blue for the movie, because it was an X-Wing squadron in the novel. Now, the same goes with the second run, made by "Blue" (Luke's squadron), covered by "Green." "Blue" became Red in the movie, so the squadron covering them off-camera (1) was Y-Wing squadron Green. THE FARLANDER PAPERS The book X-Wing: The Official Strategy Guide, an expanded version of the limited edition "Farlander Papers", relates some additional events surrounding the Battle of Yavin. It states that Red, Blue and Gold squadrons were assigned to Yavin Base from the frigate Independence. There is no mention whatsoever of Green squadron, meaning it was probably permanently assigned to the base. Upon reaching Yavin, Keyan Farlander, the main character of the story and member of Red squadron, relates: Operation 12: Begin Death Star Assault: Destroy a communications satellite, while identifying a new TIE fighter. Farlander misses the formal briefing on Yavin. Op 13: Attack Death Star Surface: Farlander and another X-Wing pilot from Red squadron are sent to destroy towers and gun emplacements. This is followed by Farlander's temporary reassignment from Red to Gold squadron (2). Op 14: The Trench Run: This is the final assault depicted in the movie. In the book, the torpedo shot that destroys the Death Star is still made by Luke Skywalker, using some tips he got from Farlander. REBEL ASSAULT In this game from Lucasarts, the player assumes the role of Rookie One, a young pilot who recently joined the Alliance. The whole storyline takes place simultaneously with the events in Star Wars IV: A New Hope, ending with the Battle of Yavin in the final chapters (Rookie One is flying X-Wing Blue 3): Chapter 12: TIE Attack: Reveals that there was a Star Destroyer in orbit of the Death Star. Four X-Wings from Blue Squadron go through waves of TIE fighters launched from the Star Destroyer before they can reach the Death Star surface. Chapter 13: Death Star Surface: Rookie One destroys lots of cannons and towers on the surface. Chapter 14: Surface Cannon: Rookie One destroys a big cannon that is protecting the exhaust port. Chapter 15: Death Star Trench: Blue 4 (Harris) is killed, Blue 2 (Murleen) is hit and pulls out, Blue Leader (Simms) shoots and misses. Then Rookie One destroys the Death Star with help from Commander Farrell, who is flying an A-Wing. Note that the fate of the Star Destroyer after Chapter 12 is never revealed. There is a continuity problem with the last part of Chapter 15, however. It is revealed that Rookie One is the one who destroyed the Death Star, instead of Luke Skywalker. But that part of the story is meant to parallel the sequence from the movie, so Blue Leader misses the shot (like Red Leader did), Blue 4 is killed and Blue 2 is hit and has to pull out (like Biggs and Wedge did), and Blue 3 destroys the Death Star. Chapter 12 would fit nicely if it took place at the same time as X-Wing's Op 12. Chapters 13 and 14 could take place during X-Wing's Op 13, and Chapter 15 during Op 14. THE STRATEGY: SURFACE ATTACK  Pilots and starfighters from Red, Gold and Blue Squadrons were re-assigned to Yavin base from the Independence. Green squadron, permanently stationed at Yavin Base (3), was made up of a mixture of Y- and X-Wings and more pilots than starfighters. Priority was given to the best-skilled pilots, so some shoving around was required to place the more experienced pilots in the bigger squadrons. Pilots like Biggs, Wedge, Luke and Porkins were assigned to Red squadron, which they decided would have twelve starfighters. Gold squadron was made up of at least seven Y-Wings. Blue Squadron was comprised of both A-Wings and X-Wings. 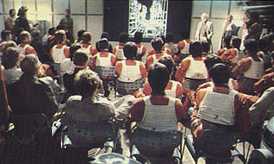  Viewed from two different angles, gives an idea on the number of pilots The formal briefing given by General Dodonna in the movie only covered the final stage of the attack: the trench run to reach the exhaust port. But there were some smaller stages preceding that, designed to weaken the Death Star's defenses as it approached the Yavin system. The first such mission included destroying a communications satellite in order to block the Death Star's transmissions to the rest of the Empire, and attacking an orbiting Star Destroyer and its TIE fighters.A second mission was a surface attack made by a small number of fighters, mostly X-Wings from Red and Blue squadrons. During that second mission, the Rebel pilots managed to destroy a number of gun turrets, towers and even a big laser cannon that was protecting the exhaust port. That cleared the way for the final assault. THE STRATEGY: TRENCH RUN After a quick debriefing on Yavin 4, all the squadrons were sent for the final assault when the Death Star was 30 minutes away. For the trench run, Alliance strategists decided that Y-Wings should have the first run, because being bombers they carry more torpedoes. The more experienced squadron was Gold, and they enforced it by re-assigning Keyan Farlander to that squadron. They would need backup from fighters who had a better chance of diverting TIE fighters. They went with Blue squadron, because it had the speedy A-Wings. Red squadron would have a go with the second run in case Gold didn't make it. They would have Green squadron to cover them, but being X-Wings with mostly veteran pilots they didn't really need a big back-up. 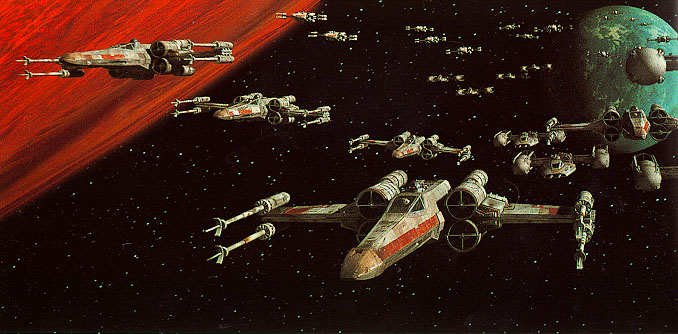 The above screen shot from A New Hope Special Edition shows the number of fighters that were sent for the attack. According to the numbers, there were twenty X-Wings and eight Y-Wings. Red Squadron consisted of 12 X-Wings, that left eight to be divided among Blue and Green squadrons. Gold squadron had 7 Y-Wings, and the other one went to Green squadron. Some A-Wings (seen only in an X-Wing cut-scene) were already part of Blue squadron. The names of the pilots can be pulled from various sources, and the list was recently completed by Decipher's Special Edition expansion set. Keep in mind that the rest of this article will use the numbers from the above shot, and will not account for any off-screen starfighters (except for two A-Wings seen in the games X-Wing and Rebel Assault): Red Squadron (X-Wings) Gold Squadron (Y-Wings): Blue squadron (X-Wings and A-Wings): Green squadron (X-Wings and Y-Wings) (13): That leaves some blanks that are not mentioned in any "official" source. However, many other pilots were named never officially assigned to any squadron. Mine is not the task to assign them to their respective squadron/fighter, but I include them here for completeness. - TravisWe know that two pilots from Red squadron are not named. There are also four pilot-less X-Wings and one more Y-Wing. They can be taken from this list. THE LOSSES As in any battle, everything did not go as was planned, and the Alliance suffered some tragic losses. In the movie, we see some pilots who get killed. The pilots seemed to attack in wings of three fighters. As mentioned before, a first surface attack resulted in two Red squadron losses: Red 6 (Porkins) and Red 9 (Naytaan). THE SURVIVORS  In the movie, we see the Milllennium Falcon, two X-Wings and a Y-Wing escape just before the explosion (above picture). The X-Wings were Luke and Wedge, and the Y-Wing is Keyan Farlander.   click on pictures to enlarge In the X-Wing game, at the same time of the explosion, we can see two X-Wings, two Y-Wings and two A-Wings escape. According to Rebel Assault, one of the A-Wings was piloted by Commander Farrell.   click on pictures to enlarge In Rebel Assault, five X-Wings and two Y-Wings are seen leaving the Death Star, one X-Wing being Blue 2 (Murleen). FINAL THOUGHTS The presence of A-Wings at Yavin is acceptable, considering the state of the Alliance's squadron management during the Civil War. And even if it consisted mostly of X-Wings, the A-Wings could still have been part of Blue squadron. The legendary Deratta Destroyers was a mixed squadron of X- and Y-Wings, and at the Battle of Endor, Blue squadron was made up of both A- and B-Wings, so the idea of a composite squadron is not unusual. ENDNOTES (1) I say "off-camera", because George Lucas had to cut down the main action on two squads rather than four as in his script. But it doesn't mean they were not present. (2) Although it states that Farlander was part of Gold squadron, one passage blurs the issue completely: "Every ship in my [Gold] Y-wing group was destroyed except for mine. I could do little, though, except clear away some TIEs and give Gold Squadron a chance at the exhaust port." Now, how can he give them a chance, if they're all dead? (3) This assumption is based on the fact that only Blue, Red and Gold squadrons are mentioned in X-Wing: The Official Strategy Guide. (4) The name Dave is from the Star Wars novelization. (5) Suspiciously absent on Decipher's list. Perhaps due to the fact that a Red 4 named Cessi "Doc" Eirriss was killed the day before in X-Wing #½. But the movie credits do name John D. (6) The name Lt. Tono Porkins is from the Marvel adaptation of the movie (Issue 6, reprinted several times and most recently as Dark Horse's Classic Star Wars: A New Hope). It was later forgotten and he was renamed Jek Porkins in Galaxy Guide 1: A New Hope and subsequent works. Also, his nickname in the movie novelization is "Piggy". (7) Also absent from Decipher's card game, but a Red 11 is heard reporting in the movie as depicted on the card "All Wings Report In". (8) Red 12 is mentioned in the movie script. The shot of him blowing up is on the "Eject! Eject!" card from Decipher's A New Hope Expansion set. (9) Phonetically named Hutch in the movie's closed captions, and the Princess Leia Journal Captive to Evil from Scholastic. (10) Talos Merkin is erroneously named Gold 5 by Princess Leia in the Journal Captive to Evil from Scholastic. There were so many new faces for her, she could have confused some of them. On a funny note: When Gold 5 says in the movie "Lost Tiree, lost Dutch," in the french dubbed version he says "They got Bill!" (11) According to X-Wing: The Official Strategy Guide, Farlander was in this squadron although his callsign is never specified. Also absent from Decipher's list. (12) Commander Farrell is from the game Rebel Assault, and seems to have arrived late in the battle in his A-Wing, at the same time Rookie One changed to an A-Wing. (13) This squadron is only mentioned in the movie novelization, therefore my inclusion of it here. Since there are seven known Y-Wings in Gold squadron, and eight are shown on the picture, I presume that the extra Y-Wing is in Green squadron. Same with the remaining number of X-Wings. (14) These pilots are from X-Wing: The Official Strategy Guide and were friends with Farlander. Except for Marskan, they were part of Red squadron although it is mentioned they were transfered shortly before the trench run. (15) "Rebel Pilot" card in Decipher's Customizable Card Game Premiere Set. His appearance in the movie seems to suggest he was flying an X-Wing. (16) Rebel Pilot template from Galaxy Guide 1: A New Hope. SOURCES - Star Wars: From the Adventures of Luke Skywalker by George Lucas, Ballantine 1976.
|